Introduction
When I started up my journey into the fabulous world of Flutter beginning 2018, very little documentation could be found on Internet compared to what exists today. Despite the number of articles that have been written, very few talk about how Flutter actually works.
What are finally the Widgets, the Elements, the BuildContext ? Why is Flutter fast and why does it sometimes work differently than expected? What are the trees?
When you are writing an application, in 95% of the cases, you will only deal with Widgets to either display something or interact with the screen. But haven't you ever wondered how all this magic actually works? How does the system know when to update the screen and which parts need to be updated?
Part 1: The background
This first part of the article introduces some key concepts that will be then used to better understand the second part of this post.
Back to the device
For once, let's start from the end and let's get back to the basics.
When you look at your device, or more specifically at your application running on your device, you only see a screen.
In fact, all what you see is a series of pixels, which together compose a flat image (2 dimensions) and when you are touching the screen with your finger, the device only recognizes the position of your finger on the glass.
All the magic of the application (from a visual perspective) consists in having that flat image updated based on, most of the time, interactions with:
- the device screen (e.g. finger on the glass)
- the network (e.g. communication with a server)
- the time (e.g. animations)
- other external sensors
The rendering of the image on the screen is ensured by the hardware (display device), which at regular interval (usually 60 times per second), refreshes the display. This refresh frequency is also called "refresh rate" and is expressed in Hz (Hertz).
The display device receives the information to be displayed on the screen from the GPU (Graphics Processing Unit), which is a specialized electronic circuit, optimized and designed to rapidly generate an image from some data (polygons and textures). The number of times per second the GPU is able to generate the "image" (=frame buffer) to be displayed and to send it to the hardware is called the frame rate. This is measured with the fps unit (e.g. 60 frames per second or 60 fps).
You will maybe ask me why did I start this article with the notions of 2-dimension flat image rendered by the GPU/hardware and the physical glass sensor... and what is the relationship with the usual Flutter Widgets?
Simply because one of the main objectives of a Flutter application is to compose that 2-dimensional flat image and to make it possible to interact with it, I think it might be easier to understand how Flutter actually works if we look at it from that perspective.
...but also because in Flutter, believe it or not, almost everything is driven by the needs of having to refresh the screen... quickly and at the right moment !
Interface between the code and the physical device
One day or another, everyone interested in Flutter already saw the following picture which describes the Flutter high-level architecture.
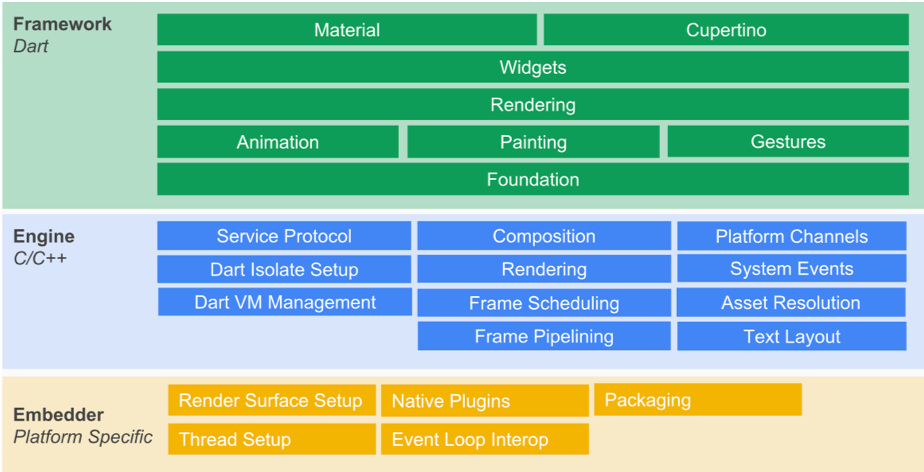
When we are writing an Flutter application, using Dart, we remain at the level of the Flutter Framework (in green).
The Flutter Framework interacts with the Flutter Engine (in blue), via an abstraction layer, called Window. This abstraction layer exposes a series of APIs to communicate, indirectly, with the device.
This is also via this abstraction layer that the Flutter Engine notifies the Flutter Framework when, among others:
- an event of interest happens at the device level (orientation change, settings changes, memory issue, application running state...)
- some event happens at the glass level (= gesture)
- the platform channel sends some data
- but also and mainly, when the Flutter Engine is ready to render a new frame
Flutter Framework is driven by the Flutter Engine frame rendering
This statement is quite hard to believe, but it is the truth.
Except in some cases (see below), no Flutter Framework code is executed without having been triggered by the Flutter Engine frame rendering.
These exceptions are:
- Gesture (= an event on the glass)
- Platform messages (= messages that are emitted by the device, e.g. GPS)
- Device messages (= messages that refer to a variation to the device state, e.g. orientation, application sent to background, memory warnings, device settings...)
- Future or http responses
The Flutter Framework will not apply any visual changes without having been requested by the Flutter Engine frame rendering.
(between us, it is however possible to apply a visual change without having been invited by the Flutter Engine, but this is really not advised to do so)
But you will ask me, if some code related to the gesture is executed and causes a visual change to happen, or if I am using a timer to rythm some task, which leads to visual changes (such as an animation, for example), how does this work then?
If you want a visual change to happen, or if you want some code to be executed based on a timer, you need to tell the Flutter Engine that something needs to be rendered.
Usually, at next refresh, the Flutter Engine will then request the Flutter Framework to run some code and eventually provide the new scene to render.
Therefore, the big question is how does Flutter Engine orchestrate the whole application behavior, based on the rendering?
To give you a flavor of the internal mechanisms, have a look at the following animation...
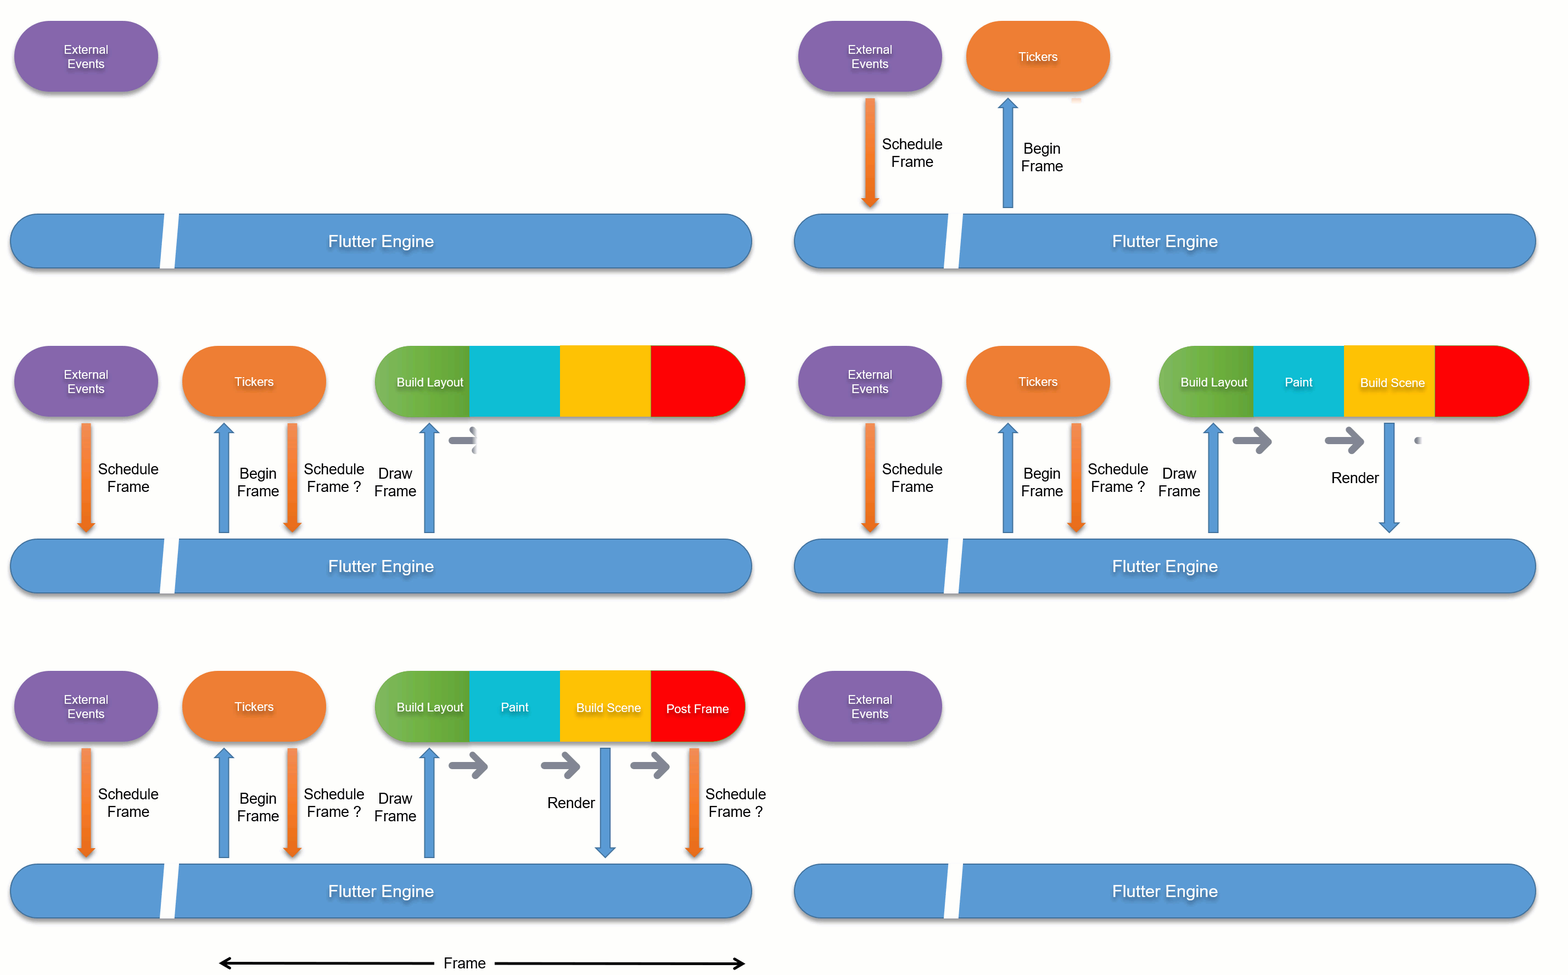
Short explanation (further details will come later):
- Some external events (gesture, http responses, ...) or even futures, can launch some tasks which lead to having to update the rendering. A message is sent to the Flutter Engine to notify it ( = Schedule Frame)
- When the Flutter Engine is ready to proceed with the rendering update, it emits a Begin Frame request
- This Begin Frame request is intercepted by the Flutter Framework, which runs any task mainly related to Tickers (such as Animations, e.g.)
- These tasks could re-emit a request for a later frame rendering... (example: an animation is not complete and to move forward, it will need to receive another Begin frame at a later stage)
- Then, the Flutter Engine emits a Draw Frame.
- This Draw Frame is intercepted by the Flutter Framework, which will look for any tasks linked to updating the layout in terms of structure and size.
- Once all these tasks are done, it goes on with the tasks related to updating the layout in terms of painting.
- If there is something to be drawn on the screen, it then sends the new Scene to be rendered to the Flutter Engine which will update the screen.
- Then, the Flutter Framework executes all tasks to be run after the rendering is complete (= PostFrame callbacks) and any other sub-sequent other tasks not rendering related.
- ... and this flow starts again and again.
RenderView and RenderObject
Before going into the details related to the flow of actions, it is the right time to introduce the notion of Rendering Tree.
As previously said, everything eventually turns out to become a series of pixels to be displayed on the screen and the Flutter Framework converts the Widgets we are using to develop the application into visual parts which will be rendered on the screen.
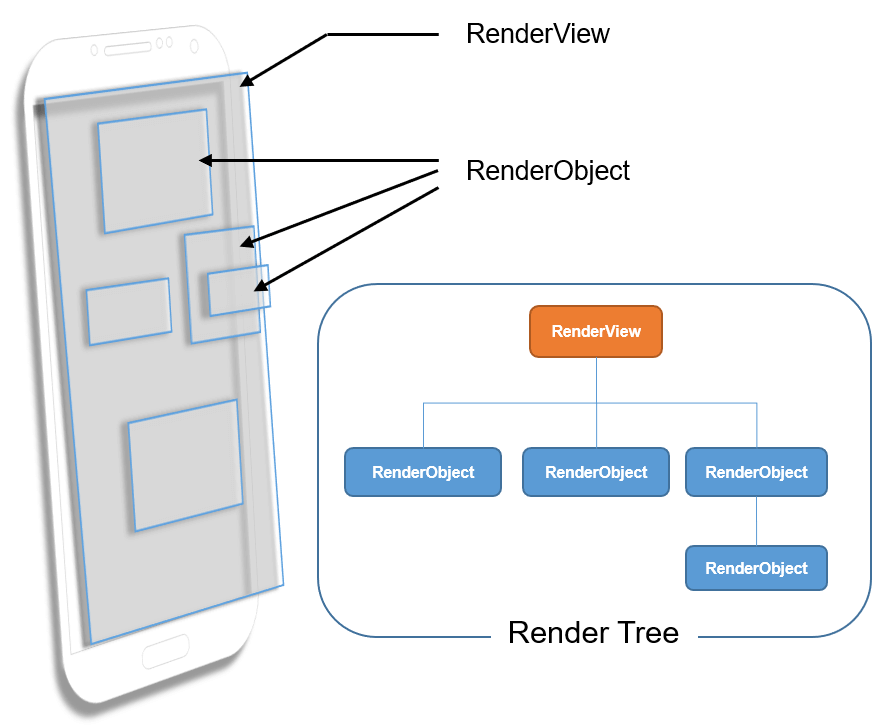
These visual parts which are rendered on the screen correspond to objects, called RenderObjects, which are used to:
- define some area of the screen in terms of dimensions, position, geometry but also in terms of "rendered content"
- identify zones of the screen potentially impacted by the gestures (= finger)
The set of all the RenderObject forms a tree, called Render Tree. At the top of that tree (= root), we find a RenderView.
The RenderView represents the total output surface of the Render Tree and is itself a special version of a RenderObject.
Visually speaking we could represent all this as follows:
The relationship between Widgets and RenderObjects will be discussed later in this article.
It is now time to go a bit deeper...
First things first - initialization of the bindings
When you start a Flutter application, the system invokes the main() method which will eventually call the runApp(Widget app) method.
During that call to the runApp() method, Flutter Framework initializes the interfaces between the Flutter Framework and the Flutter Engine. These interfaces are called bindings.
The Bindings - Introduction
The bindings are meant to be some kind of glue between the Flutter Engine and the Flutter Framework. It is only through these bindings that data can be exchanged between the two Flutter parts (Engine and Framework).
(There is only one exception to this rule: the RenderView but we will see this later).
Each Binding is responsible for handling a set of specific tasks, actions, events, regrouped by domain of activities.
At time of writing this article, Flutter Framework counts 8 bindings.
Below, the 4 ones that will be discussed in this article:
- SchedulerBinding
- GestureBinding
- RendererBinding
- WidgetsBinding
For sake of completeness, the last 4 ones (which will not be addressed in this article):
- ServicesBinding: responsible for handling messages sent by the platform channel
- PaintingBinding: responsible for handling the image cache
- SemanticsBinding: reserved for later implementation of everything related to Semantics
- TestWidgetsFlutterBinding: used by widgets tests library
I could also mention the WidgetsFlutterBinding but the latter is not really a binding but rather some kind of "binding initializer".
The following diagram shows the interactions between the bindings I am going to cover a bit later in this article and the Flutter Engine.
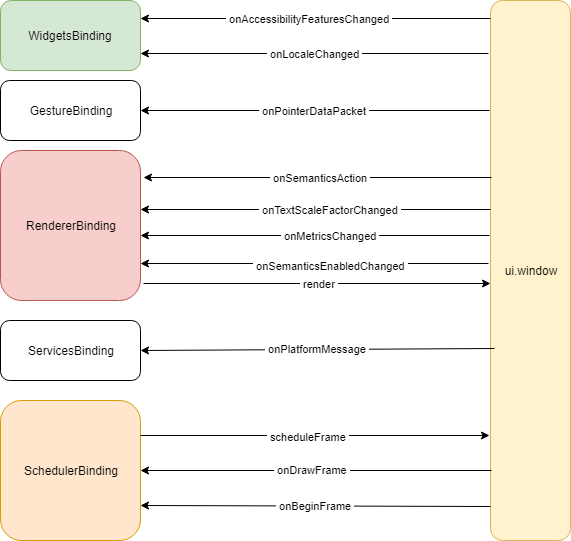
Let's have a look at each of these "main" bindings.
SchedulerBinding
This binding has 2 main responsibilities:
- the first one is to tell the Flutter Engine: "Hey! next time you are not busy, wake me up so that I can work a bit and tell you either what to render or if I need you to call me again later...";
- the second one is to listen and react to such "wake up calls" (see later)
When does the SchedulerBinding request for a wake-up call?
When a Ticker needs to tick
For example, suppose you have an animation and you start it. An animation is cadenced by a Ticker, which at regular interval (= tick) is called to run a callback. To run such callback, we need to tell the Flutter Engine to wake up us at next refresh (= Begin Frame). This will invoke the ticker callback to perform its task. At the end of that task, if the ticker still needs to move forward, it will call the SchedulerBinding to schedule another frame.When a change applies to the layout
When for example, you are responding to an event that leads to a visual change (e.g. updating the color of a part of the screen, scrolling, adding/removing something to/from the screen), we need to take the necessary steps to eventually render it on the screen. In this case, when such change happens, the Flutter Framework will invoke the SchedulerBinding to schedule another frame with the Flutter Engine. (we will see later how it actually works)
GestureBinding
This binding listens to interactions with the Engine in terms of "finger" (= gesture).
In particular, it is responsible for accepting data related to the finger and to determine which part(s) of the screen is/are impacted by the gestures. It then notifies this/these parts accordingly.
RendererBinding
This binding is the glue between the Flutter Engine and the Render Tree. It has 2 distinct responsibilities:
- the first one is to listen to events, emitted by the Engine, to inform about changes applied by the user via the device settings, which impact the visuals and/or the semantics
- the second one is to provide the Engine with the modifications to be applied to the display.
In order to provide the modifications to be rendered on the screen, this Binding is responsible for driving the PipelineOwner and initializing the RenderView.
The PipelineOwner is a kind of orchestrator that knows which RenderObject's need to do something in relation with the layout and coordinates these actions.
WidgetsBinding
This binding listens to changes applied by the user via the device settings, which impact the language (= locale) and the semantics.
Side note
At a later stage, I suppose that all events related to the Semantics will be migrated to the SemanticsBinding but at time of writing this article, this is not yet the case.
Besides this, the WidgetsBinding is the glue between the Widgets and the Flutter Engine. It has 2 distinct main responsibilities:
- the first main one is to drive the process in charge of handling the Widgets structure changes
- the second one is to trigger the rendering
The handling of the Widgets Structure changes is done via the BuildOwner.
The BuildOwner tracks which Widgets need rebuilding, and handles other tasks that apply to widget structures as a whole.
Part 2: from Widgets to pixels
Now that we have introduced the basics of the internal mechanics, it is time to talk about Widgets.
In all Flutter documentation, you will read that everything is Widgets.
Well, it is almost correct but in order to be a bit more precise, I would rather say:
From a Developer perspective, everything related to the User Interface in terms of layout and interaction, is done via Widgets.
Why this precision? Because a Widget allows a developer to define a part of the screen in terms of dimensions, content, layout and interaction BUT there is so much more. So what is a Widget, actually?
Immutable Configuration
When you read the Flutter source code, you will notice the following definition of the Widget class.
1
2
3abstract class Widget extends DiagnosticableTree {
4 const Widget({ this.key });
5
6 final Key? key;
7
8 ...
9}
10What does this mean?
The annotation "@immutable" is very important and tells us that any variable in a Widget class has to be FINAL, in other words: "is defined and assigned ONCE FOR ALL". So, once instantiated, the Widget will no longer be able to adapt its inner variables.
A Widget is a kind of constant configuration since it is IMMUTABLE
The Widgets hierarchical structure
When you develop with Flutter, you define the structure of your screen(s), using Widgets... Something like:
Widget build(BuildContext context){
  return SafeArea(
      child: Scaffold(
          appBar: AppBar(
              title: Text('My title'),
          ),
          body: Container(
              child: Center(
                  child: Text('Centered Text'),
              ),
          ),
      ),
  );
}
This sample uses 7 Widgets, which together form a hierarchical structure. The very simplified structure, based on the code, is the following:
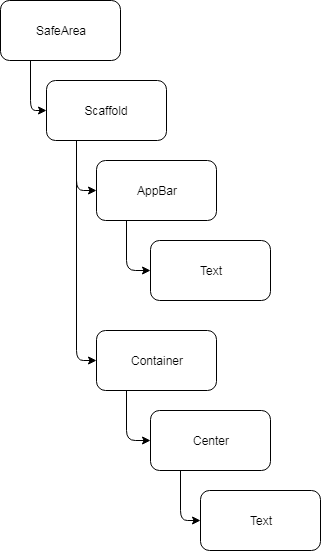
As you can see, this looks like a tree, where the SafeArea is the root of the tree.
The forest behind the tree
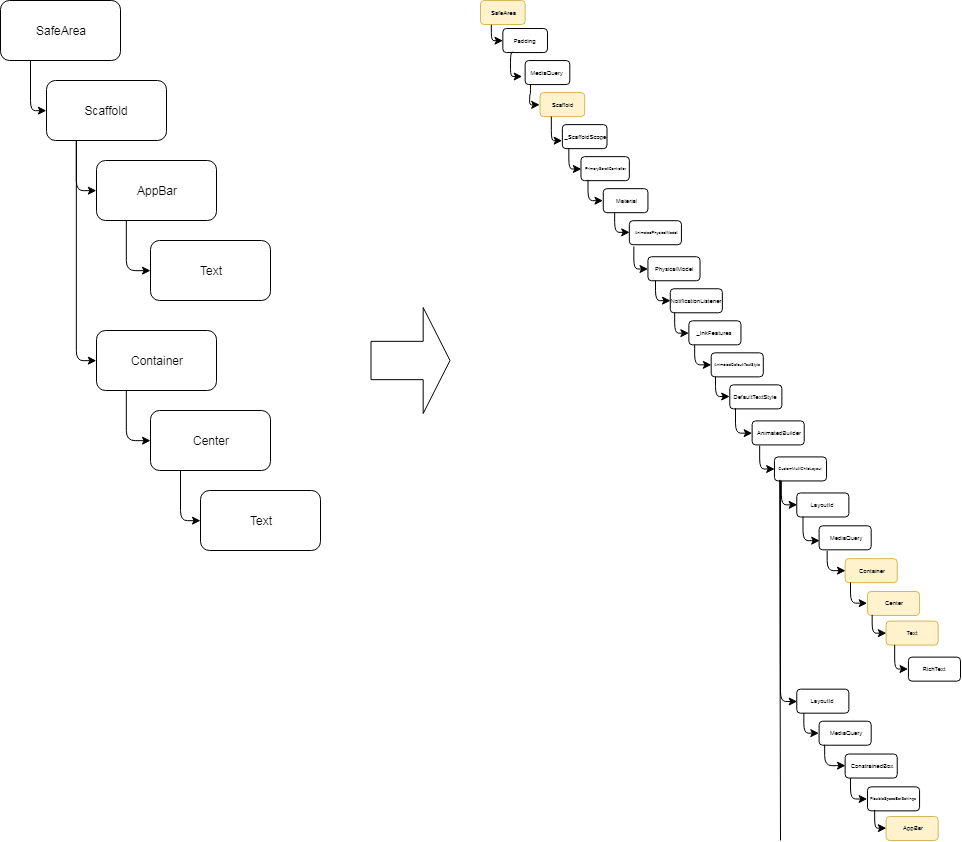
As a you already know, a Widget may itself be an aggregation of other Widgets. As an example, I could have written the previous code the following way:
Widget build(BuildContext context){
  return MyOwnWidget();
}
This assumes that the widget "MyOwnWidget" would itself render the SafeArea, Scaffold... but the most important with this example is that
a Widget maybe a leaf, a node in a tree, even a tree itself or why not a forest of trees...
The notion of Element in the tree
Why did I mention this?
As we will see later how, in order to be able to generate the pixels that compose the image to be rendered on the device, Flutter needs to know in details all the little parts that compose the screen and, to determine all the parts, it will request to inflate all the Widgets.
In order to illustrate this, consider the russian dolls principle: closed you only see 1 doll but the latter contains another one which in turn contains another one and so on...

When Flutter will have inflated all the widgets, part of the screen, it will be similar to obtaining all the different russian dolls, part of the whole.
The following diagram shows a part of the final Widget hierarchical structure that corresponds to the previous code. In yellow, I have highlighted the Widgets that were mentioned in the code so that you can spot them in the resulting partial widgets tree.
Important clarification
The wording "Widget tree" only exists for sake of making it easier to understand since programmers are using Widgets but, in Flutter there is NO Widget tree!
In fact, to be correct, we should rather say: "tree of Elements"
It is now time to introduce the notion of Element...
To each widget corresponds one element. Elements are linked to each other and form a tree. Therefore an element is a reference of something in the tree.
At first, think of an element as a node which has a parent and potentially a child. Linked together via the parent relationship, we obtain a tree structure.
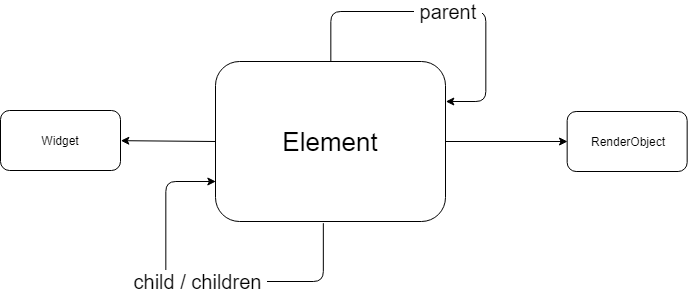
As you can see in the picture above, the Element points to one Widget and may also point to a RenderObject.
Even better... the Element points to the Widget which created the element !
Let me recap...
- there is no Widgets tree but a tree of Elements
- Elements are created by the Widgets
- an Element references the Widget that created it
- Elements are linked together with the parent relationship
- Elements could have a child or children
- Elements could also point to a RenderObject
Elements define how parts of the visuals are linked to each other
In order to better visualize where the notion of element fits, let's consider the following visual representation:
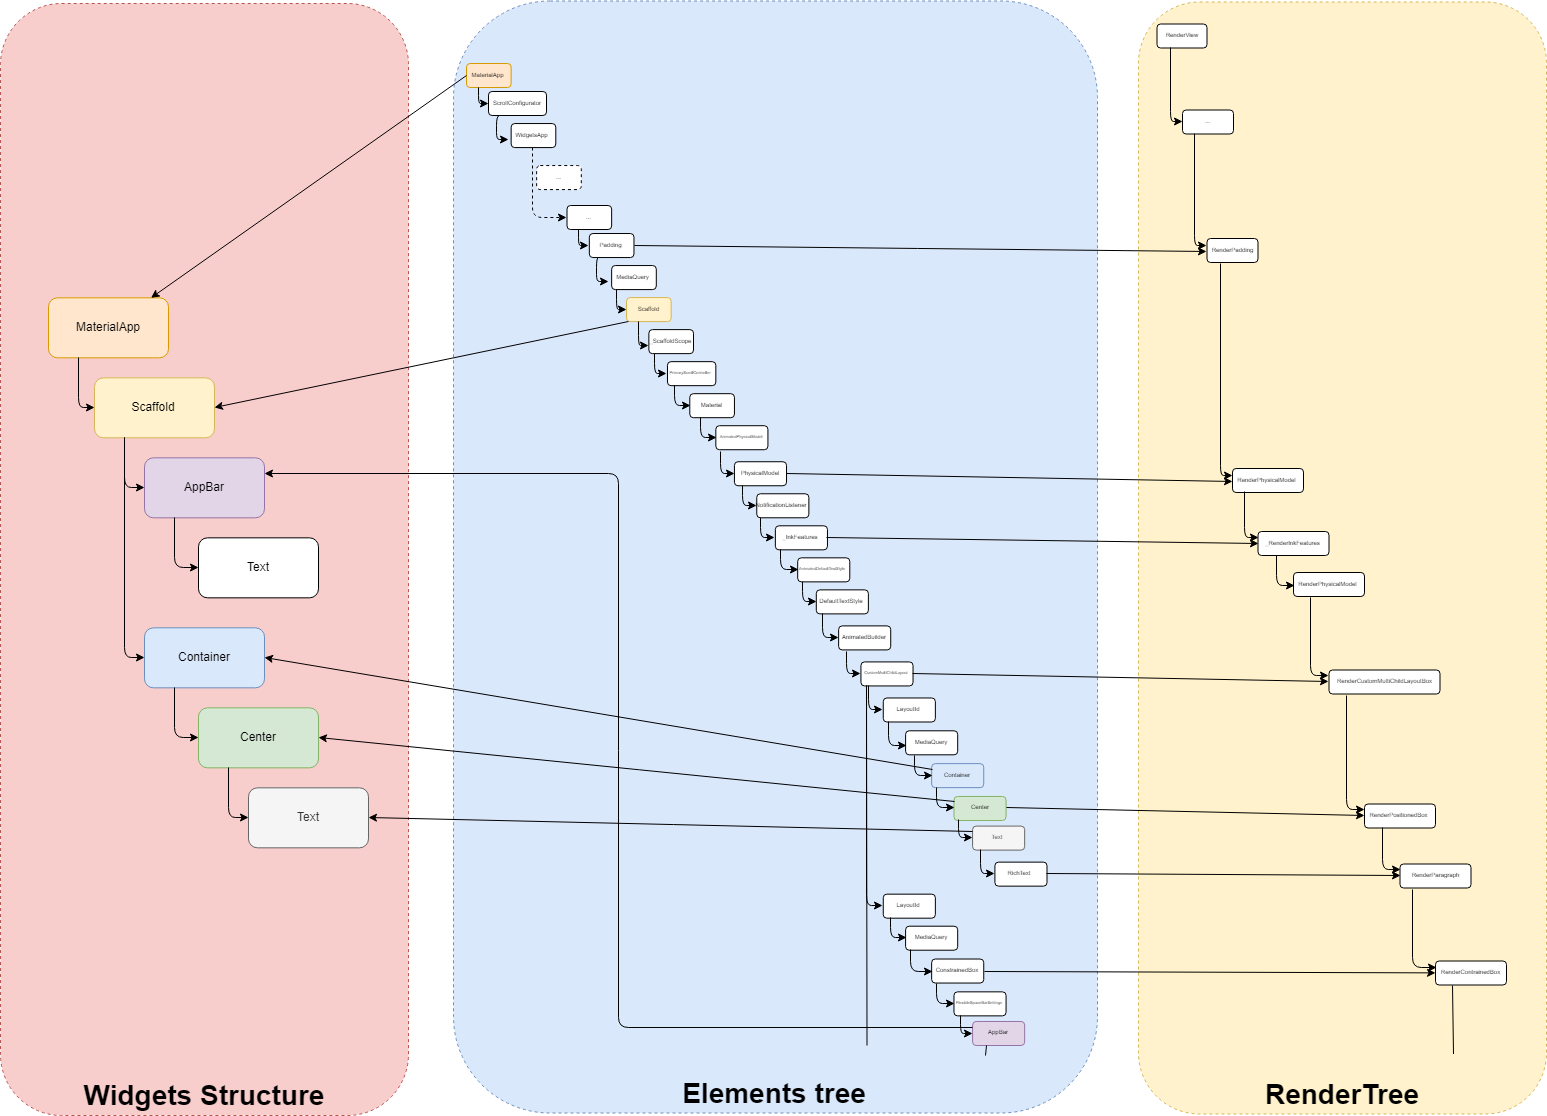
As you can see the elements tree is the actual link between the Widgets and the RenderObjects.
But, why does the Widget create the Element?
3 main categories of Widgets
In Flutter, Widgets are split into 3 main categories, I personally call these categories:
(but this is only my way of categorizing them)
the proxies
The main role of these Widgets is to hold some piece of information which needs to be made available to the Widgets, part of the tree structure, rooted by the proxies. A typical example of such Widgets is the InheritedWidget or LayoutId.
These Widgets do not directly take part of the User Interface but are used by others to fetch the information they can provide.
the renderers
These Widgets have a direct involvement with the layout of the screen as they define (or are used to infer) either:
- the dimensions;
- the position;
the layout, rendering.
Typical examples are: Row, Column, Stack but also Padding, Align, Opacity, RawImage...
the components.
These are the other Widgets which are not directly providing the final information related to dimensions, positions, look but rather data (or hint) which will be used to obtain the final information. These Widgets are commonly named components.
Examples are: RaisedButton, Scaffold, Text, GestureDetector, Container...

The following PDF lists most of the Widgets, regrouped by categories.
Why is that split important? Because depending on the Widget category, a corresponding Element type is associated...
The Element types
Here are the different element types:
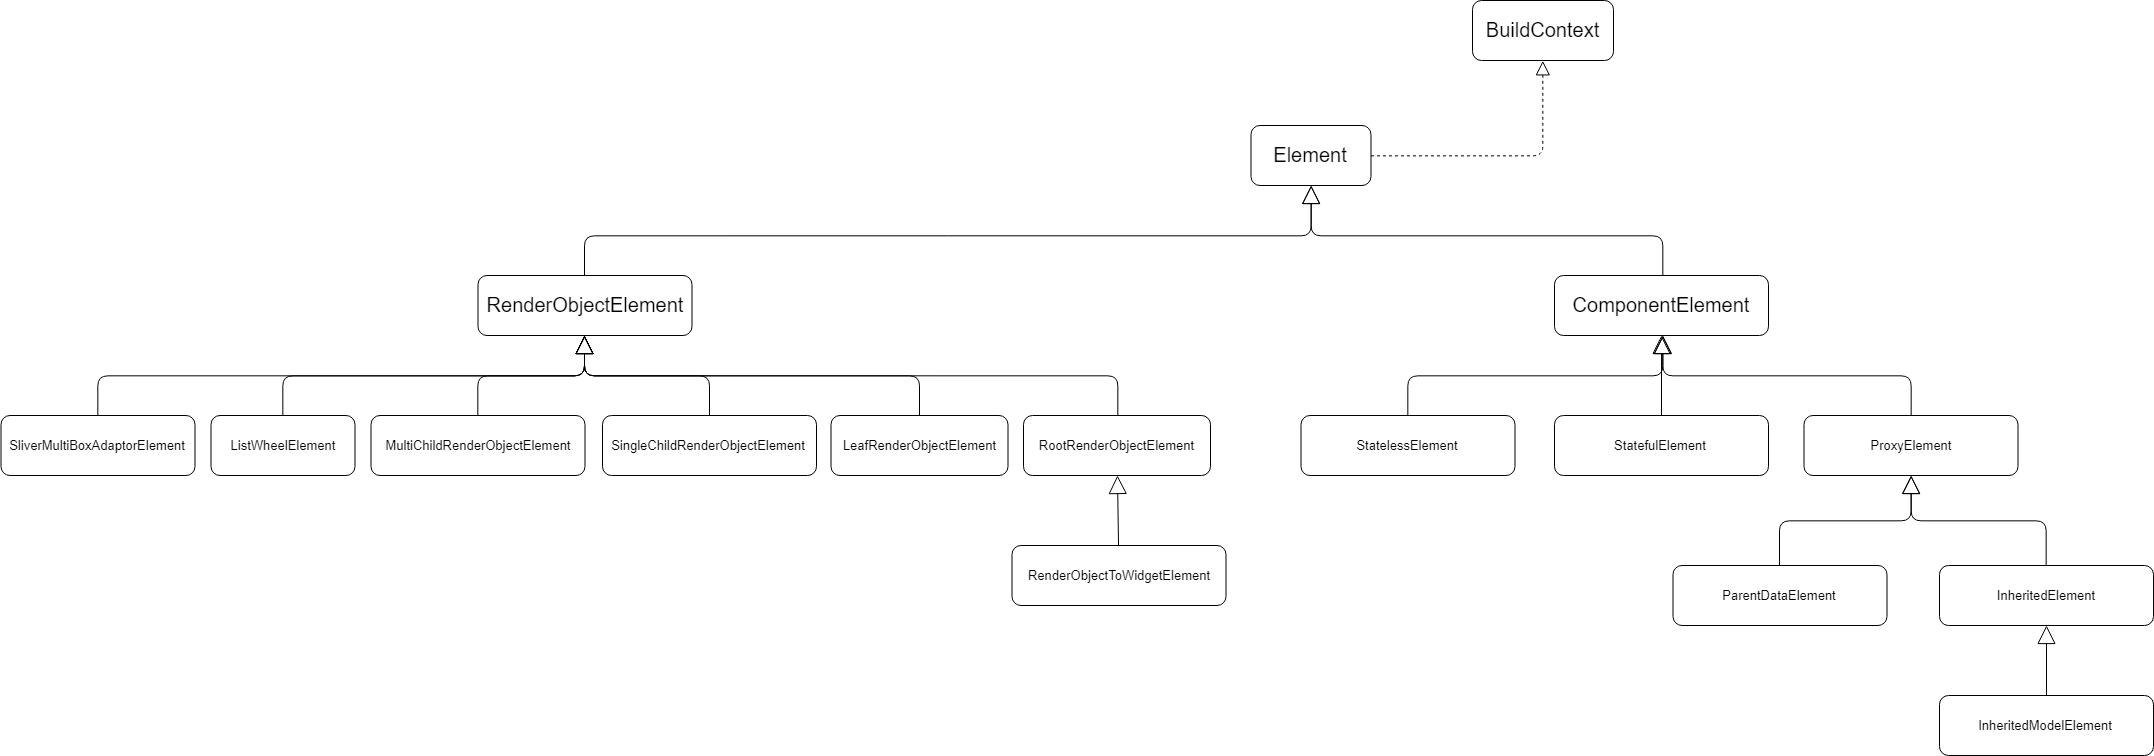
As you can see in the picture above, Elements are split into 2 main types:
ComponentElement
These elements do not directly correspond to any visual rendering part.
RenderObjectElement
These elements correspond to a part of the rendered screen.
Great! Lots of information so far but how is everything linked together and why was it interesting to introduce all this?
How do Widgets and Elements work together?
In Flutter, the whole mechanics relies on invalidating either an element or a renderObject.
Invalidating an element can be done in different ways:
- by using setState, which invalidates the whole StatefulElement (notice that I am intentionally not saying StatefulWidget)
- via notifications, handled by other proxyElement (such as InheritedWidget, for example), which invalidates any element that depends on that proxyElement
The outcome of an invalidation is that the corresponding element(s) is/are referenced in a list of dirty elements.
Invalidating a renderObject means that no changes are applied to the structure of the elements but a modification at the level of a renderObject happens, such as
- changes to its dimensions, position, geometry...
- needs to be repainted, for example when you simply change the background color, the font style...
The outcome of such invalidation is that the corresponding renderObject is referenced in a list of renderObjects that need to be rebuilt or repainted.
Whatever the type of invalidation, when this happens, the SchedulerBinding (remember it?) is requested to ask the Flutter Engine to schedule a new frame.
It is when the Flutter Engine wakes up the SchedulerBinding that all the magics happens...
onDrawFrame()
Earlier in this article, we mentioned that the SchedulerBinding had 2 main responsibilities, one of which was to be ready to handle requests emitted by the Flutter Engine, related to frame rebuild. This is the perfect moment to focus on this now...
The partial sequence diagram below shows what happens when the SchedulerBinding receives a request onDrawFrame() from the Flutter Engine.
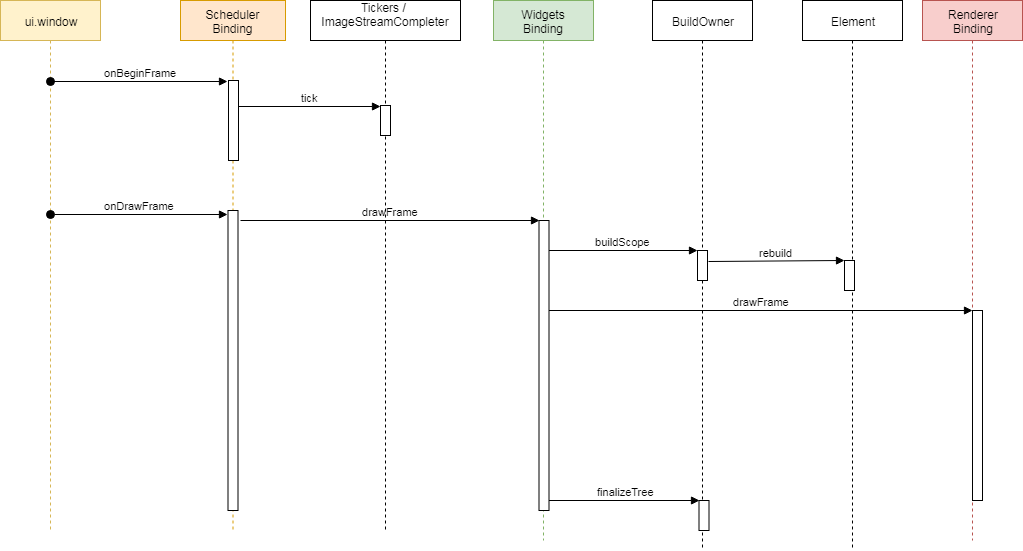
Step 1: the elements
The WidgetsBinding is invoked and the latter first considers the changes related to the elements.
As the BuildOwner is responsible for handling the elements tree, the WidgetsBinding invokes the buildScope method of the buildOwner.
This method iterates the list of invalidated elements (= dirty) and requests them to rebuild.
The main principles of this rebuild() method are:
- request the element to rebuild() which leads to most of the time, invoking the build() method of the widget referenced by that element (= method Widget build(BuildContext context){...}). This build() method returns a new widget.
- if the element has no child, the new widget is inflated (see just after), otherwise
- the new widget is compared to the one referenced by the child of the element.
- If they could be exchanged (=same widget type and key), the update is made, the child element is kept.
- If they could not be exchanged, the child element is unmounted (~ discarded) and the new widget is inflated.
- The inflating of the widget leads to creating a new element, which is mounted as new child of the element. (mounted = inserted into the elements tree)
The following animation tries to make this explanation a bit more visual.

Note on Widget inflating
When the widget is inflated, it is requested to create a new element of a certain type, defined by the widget category.
Therefore,
- an InheritedWidget will generate an InheritedElement
- a StatefulWidget will generate a StatefulElement
- a StatelessWidget will generate a StatelessElement
- an InheritedModel will generate an InheritedModelElement
- an InheritedNotifier will generate an InheritedNotifierElement
- a LeafRenderObjectWidget will generate a LeafRenderObjectElement
- a SingleChildRenderObjectWidget will generate a SingleChildRenderObjectElement
- a MultiChildRenderObjectWidget will generate a MultiChildRenderObjectElement
- a ParentDataWidget will generate a ParentDataElement
Each of these element types has a distinct behavior.
For example
- a StatefulElement will invoke the widget.createState() method at initialization, which will create the State and link it to the element
- a RenderObjectElement type will create a RenderObject when the element will be mounted, this renderObject will be added to the render tree and linked to the element.
Step 2: the renderObjects
Once all actions related to dirty elements have been completed, the elements tree is now stable and it is time to consider the rendering process.
As the RendererBinding is responsible for handling the rendering tree, the WidgetsBinding invokes the drawFrame method of the RendererBinding.
The partial diagram below shows the sequence of actions performed during a drawFrame() request.
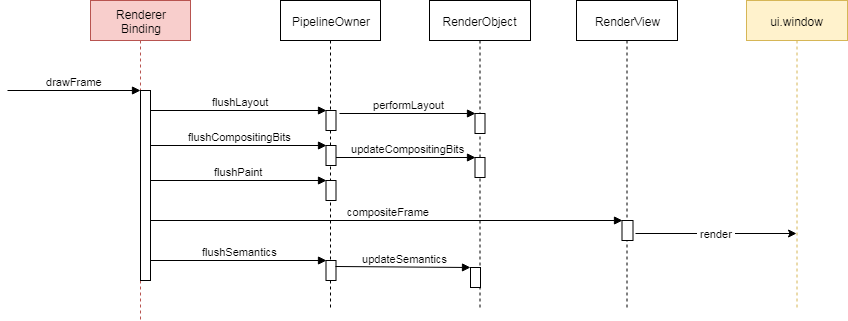
During this step, the following activities are performed:
- each renderObject marked as dirty is requested to perform its layout (meaning calculating its dimensions and geometry)
- each renderObject marked as needs paint is repainted, using the renderObject's layer.
- the resulting scene is built and sent to the Flutter Engine so that the latter transmits it to the device screen.
- finally the Semantics is also updated and sent to the Flutter Engine
At the end of this flow of actions, the device screen is updated.
Part 3: Gesture handling
The gestures (= events related to the finger on the glass) is handled by the GestureBinding.
When the Flutter Engine sends information related to a gesture-related event, through the window.onPointerDataPacket API, the GestureBinding intercepts it, proceeds with some buffering and:
- converts the coordinates emitted by the Flutter Engine to match the device pixel ratio, then
- requests the renderView to provide a list of ALL RenderObjects which cover a part of screen containing the coordinates of the event
- then iterates that list of renderObjects and dispatches the related event to each of them.
- when a renderObject is waiting for this kind of event, it processes it.
From this explanation, we directly see how important renderObjects are...
Part 4: Animations
This last part of the article focuses on the notion of Animations and more specifically on the notion of Ticker.
When you initiate an animation, you generally use an AnimationController or any similar Widget or component.
In Flutter, everything which is related to animation refers to the notion of Ticker.
A Ticker does only one thing, when active: "it requests the SchedulerBinding to register a callback and ask the Flutter Engine to wake it up when next available".
When the Flutter Engine is ready, it then invokes the SchedulerBinding via a request: "onBeginFrame".
The SchedulerBinding intercepts this request then iterates the list of ticker callbacks and invokes each of them.
Each ticker tick is intercepted by any controller interested in this event to process it. If the animation is complete, the ticker is "disabled", otherwise, the ticker requests the SchedulerBinding to schedule another callback. And so on...
Global Picture
Now that we have seen how the Flutter internals work, here is the global picture:

BuildContext
Final word...
If you recall the diagram that shows the different element types, you most probably noticed the signature of the base Element:
abstract class Element extends DiagnosticableTree implements BuildContext {
  ...
}
Here is the famous BuildContext.
What is a BuildContext?
The BuildContext is an interface that defines a series of getters and methods that could be implemented by an element, in an harmonized manner.
In particular, the BuildContext is mainly used in the build() method of a StatelessWidget and StatefulWidget or in a StatefulWidget State object.
The BuildContext is nothing else but the Element itself which corresponds to
- the Widget being rebuilt (inside the build or builder methods)
- the StatefulWidget linked to the State where you are referencing the context variable.
This means that most developers are constantly handling elements even without knowing it.
How useful the BuildContext can be?
As the BuildContext corresponds to the element related to the widget but also to a location of the widget in the tree, this BuildContext is very useful to:
- obtain the reference of the RenderObject that corresponds to the widget (or if the widget is not a renderer, the descendant widget)
- obtain the size of the RenderObject
- visit the tree. This is actually used by all the Widgets which usually implement the of method (e.g. MediaQuery.of(context), Theme.of(context)...)
Just for the fun...
Now that we have understood that the BuildContext is the element, for the fun I wanted to show you another way of using it...
The following totally useless code makes possible for a StatelessWidget to update itself (as if it was a StatefulWidget but without using any setState()), by using the BuildContext ...
WARNING
Please do not use this code!
Its sole purpose is to demonstrate that a StatelessWidget is able to request to be rebuilt.
If you need to consider some state with a Widget, please use a StatefulWidget
void main() {
runApp(MaterialApp(
home: TestPage(),
));
}
class TestPage extends StatelessWidget {
// final because a Widget is immutable (remember?)
final bag = {"first": true};
Widget build(BuildContext context) {
return Scaffold(
appBar: AppBar(title: const Text('Stateless ??')),
body: Center(
child: GestureDetector(
child: Container(
width: 50.0,
height: 50.0,
color: bag["first"]! ? Colors.red : Colors.blue,
),
onTap: () {
bag["first"] = !bag["first"]!;
//
// This is the trick
//
(context as Element).markNeedsBuild();
}),
),
);
}
}
Between us, when you are invoking the setState() method, the latter ends up doing the very same thing: _element.markNeedsBuild().
Conclusions
Yet another long article, will you tell me.
I thought it could be interesting to know how Flutter has been architectured and to remind that everything has been designed to be efficient, scalable and open to future extensions.
Also, key concepts such as Widget, Element, BuildContext, RenderObject are not always obvious to apprehend.
I hope that this article might have been useful.
Stay tuned for new articles, soon. Meanwhile, let me wish you a happy coding.
